Panic at the packaging factory?

What do you do when you are asked to produce some marketing shots in an hour, and your photography gear is 5 miles away at home? Panic? No, improvise.

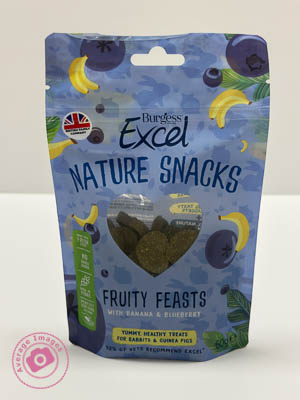
I used the camera in my pocket (my trusty iPhone), made a makeshift studio by setting up a table in one of the meeting rooms and purloined a marketing pop-up banner from the Sales department to use as a backdrop. It is 6 feet high, so I used some gaffer tape to allow it to remain ‘popped-up’ at a more practical 4 feet. It is also quite narrow and left areas on either side without any background, so I used some white foam board on both sides, knowing that I would need to blend them in during post-processing. I positioned the packaging samples in an arrangement that I thought was ‘artistic’ and used Portrait mode on the iPhone, which I know gives a good result for product shots, as well as people portraits.

Fortunately, I have both Lightroom and Photoshop on my laptop, and with two large monitors attached, I could do the post-processing immediately. Lightroom is more than adequate for these relatively simple edits, and I only used Photoshop to fill in the upper corners where there was no white background. For example, Lightroom’s healing brush made light work of removing the join between the two tables I used as a base.

As shot

The only slight faux pas was that when I emailed over the first proof, the comment I received back was that the editing of the background in the upper corners was noticeable. It had looked acceptable to me, but I quickly realised that the contrast on one of the monitors was set incorrectly and over-exposed my view during the post-processing. Once Lightroom was dragged over onto the other monitor, I could see the issue and was able to quickly adjust the exposure to rectify the problem.

Of course, it didn’t take long before I got the dreaded “while you are doing that, can you do this” and so I also ended up taking some individual shots ‘on white’. I used the two aforementioned foam boards in an ‘L’ configuration to make the background as light as possible and then, in Lightroom, used ‘select subject’, inverted it to select the background, and then over-exposed it to make the background completely white. Once again, Lightroom produced a result in seconds, formerly only possible in Photoshop. Five of the images are being used for a display stand at a forthcoming exhibition.

As shot
After Post Processing

Coincidentally, Lightroom had an update this week which added some more tools, including a beta version of lens blur. If only they could add layers, photographers wouldn’t need Photoshop at all.

Painting with light: Light of my life

In my last Painting with light blog post, Interior Light, I discussed taking photographs indoors. Within this category is a sub-genre of indoor art called ‘Still Life‘.

A ‘still life’ is a picture (painting, drawing or photograph) of an arrangement of inanimate objects, the purpose of which is to show a new way of looking at the ordinary things around us. Traditionally they tend to be composed of flowers, food or (dead) animals.

Still lifes are not new:

  • Egyptian burial sites dating from the 15th century BC contained paintings of crops and food.
  • The ancient Greeks and Romans created still life mosaics and frescoes.
  • Artists in the Middle Ages used still life to depict religious and Biblical scenes.
  • During the Renaissance period (15th-16th century) floral paintings became popular, as did the desire to depict everyday objects as realistically as possible.
  • The Modern Art movement often had table-top scenes with vases, wine bottles and fruit.

In photography, still life became popular from the early 19th century. One of the reasons for its popularity is that it is relatively easy to set up, without having to worry about the vagaries of people or the weather. However, much like any genre of photography, taking the photograph is the easy part and it is the setting of the scene which differentiates a great still life from a good one. This means careful positioning of the components with regards to general composition, leading lines, complementary colours and sometimes including a hidden meaning (for example, decaying subjects are often used to symbolise the fragility of life). It needs to be a piece of art rather than just a record shot.

A meagre lunch

Remember, you can keep up-to-date with all of the Painting with light blog posts by subscribing:

Shooting cars 2

Another set of automotive detail shots.

Since my similar post Shooting Cars a few weeks ago, news has broken here in the UK, that the proposed ban on the sale of petrol and diesel-engined cars, which was due to come into force in 2030, has been put back by 5 years. The Prime Minister stated this was because of the significant hurdles in choosing one, notably the high costs and lack of a nationwide charging infrastructure. However, he also noted that the ban would now include all hybrid and plug-in hybrid cars, meaning that only fully electric cars and vans can be purchased after 2035 if this deadline doesn’t shift again.

If you were to believe the media here in the UK, you might be forgiven for thinking that this ban is a worldwide policy, but it isn’t. It is actually quite challenging to find a summary of different countries’ positions regarding electric vehicles. In fact, I couldn’t find anything that encompassed all of the world’s countries; there only seems to be information about those that have an EV policy, and there is little information about those that do not (and there is plenty of them, it seems). Proponents are happy to quote that, in 2022, sales of electric cars increased by 55%. It’s a great soundbite, but the reality is that only 14% of global car sales were electric, which means 86% of cars sold worldwide were not!

Of course, this may all change if the major car manufacturers continue with their own voluntary pledges to stop producing cars with internal combustion engines. However, this is a risky strategy for any business – you need to make products that people want to buy, not those that you want to sell – no matter how environmentally friendly they appear. The human race has always been transient in nature; perhaps it’s because we always feel that “the grass is greener on the other side of the fence”, and to try and curtail this is doomed to failure.

The ‘elephant in the room’ is that batteries just aren’t technologically advanced enough to provide sufficient power to make the journeys that we now expect to make, in the comfort that we expect to make them in. The primary purpose of a car is to get us from A to B without stopping; with B being as far away from A as possible. If you are serious about using an electric vehicle to do so, then you need to remove everything that saps power from that important goal – so no air conditioning, satellite navigation, electric windows, radios, daytime running lights, etc. Also, you need to get rid of those big fat tyres and replace them with low rolling-resistance skinny ones – and whilst you are at it, remove of all that heavy, metal bodywork as well.

Ideally you would end up with a very small, fibreglass-bodied, three-wheeled vehicle with the largest battery you can fit into it. Those of a certain age may now have a mental image of something called the Sinclair C5. This was produced some 38 years ago as a commercially-viable electric car for the mass-market. It failed!

Anyway, enough of that – and here are some detail photographs of a car with a petrol engine.

Painting with light: Interior light

Painting with light doesn’t always have to be done outside – you can also create some very interesting images indoors – and the good thing is that you don’t need a dedicated studio or any fancy studio lights, you can just do this on your kitchen table.

Late night reading

The first thing that you need is a dark room. You may think, in the daytime, that just closing the curtains will be enough, but as your eyes become accustomed you will notice that the room won’t be totally dark at all and there will be enough ambient light seeping in around the sides, top and bottom of the curtains to ruin a good light painting. The obvious solution is to do your indoor Painting with light at night or early morning (or spend a lot of time taping over the gaps around windows and doors).

The second consideration is the lights that you are going to use. The torches you use for outdoor Painting with light will be too big and too bright so you can either invest in a much smaller torch or create homemade ‘snoots’ for your large torch to funnel the light down to a smaller beam.

You can create a homemade snoot with a piece of dark-coloured card folded into a cone shape and then trimmed to suit the head of the torch. The bottom of the cone can then be trimmed to the hole size that you require. I will discuss light modifiers in a later blog post.

The actual image will be taken in the same way as you would outdoors, not forgetting to create an interesting composition for your still life. The good thing is that the physical size of an indoor shot is often going to be a lot smaller than an outdoor one, and so you usually need to take far fewer shots to capture the entire scene. This makes the post-processing into the final composite a lot quicker and easier.


The subject of the image featured in this blog post is actually a recreation of a recreation. If you check back on my blog post The Art Journal from March 2022, you will see that I describe how I replicated a previous shot of an oil lamp and some antique Art Journal compendiums because the original image had been lost. On both previous occasions, I had used a single light source from the lit oil lamp itself, which, although atmospheric, had created some deep shadows. In this second recreation, I decided to use Painting with light to illuminate the scene (and didn’t actually light the oil lamp at all). It is a composite image, with blending modes and layer masks combining just 4 individual shots (although I took 19 shots during the actual photoshoot just to be sure that I had illuminated every part of the scene). I have to say that I am pretty pleased with the result – the lighting is far more controlled than just using the oil lamp as a light source, and to try and achieve this effect using studio strobes would have been very time-consuming and complex.

Remember, you can keep up-to-date with all of the Painting with light blog posts by subscribing:

Oh what a tangled web

Or so the saying goes. But probably not as complex as this multi-storey web that greeted me this morning, the silken fibres accentuated by the fine water droplets from the mist-laden air.

Now, I’m not sure if this is the work of one spider who has claimed the entire conifer bush or whether there are multiple tenants in occupancy, but it is very impressive – although perhaps not if you suffer from arachnophobia!

Oh what a tangled web

There are over 650 spider species in the UK, but not all of them make webs (the others are ‘sit and wait’ hunters). It only takes about an hour for a spider to spin the average web, and they often make a new one each evening (maybe that explains why there are so many here). Contrary to popular belief, they are not just for catching prey; they are also used to attract a mate and, later on, protect their young.

โ€˜Oh what a tangled web we weave / When first we practice to deceiveโ€™ is from a poem; ‘Marmion: A Tale of Flodden Field’ by Scottish author Sir Walter Scott (1771-1832).

Painting with light: Making light work of it

Making light work of it

Once you have worked out the camera settings required for landscape Painting with light, you can take some photographs. Or can you? There are some things that you need to plan first if you are working outdoors:

Time of day:

I suppose it goes without saying that you need it to be dark (although maybe not pitch black). Therefore we are looking at either first thing in the morning or last thing at night, so a lot depends on whether you are a morning or nighttime person. I suppose that a night shoot is probably best – if you overrun your time in a morning shoot, everything will get lighter as the sun rises, spoiling the mood.

Time of year:

Fortunately, the best seasons for Painting with light are those when it stays dark later in the morning and gets darker earlier at night, i.e. Autumn and Winter. During these seasons, you get the autumnal golden foliage, snow and frosts – all of which make for some great shots.

Weather:

Since we have already ascertained that Autumn and Winter are good times of the year, I think it is reasonably apparent that it may get cold. However, you need to avoid very wet and foggy days. These diffract the light too much and the shots will look out-of-focus and lack detail. Also, because you will be making long exposures you won’t want a breezy day (unless you want to show the movement of the trees).

Location:

We will look at composition in a later blog post, but you need to find locations that lend themselves to having elements illuminated while creating an attractive picture. You also need somewhere relatively secluded so that you have the time to take multiple exposures whilst walking around with your torch without getting accosted by well-meaning strangers.

Single shot or composite?

Although you can do Painting with light in a single shot, it does make it a rather trial-and-error process. If you don’t light up the correct areas, you get some stray light glaring back into the lens, or you get yourself in the shot, it’s all for nothing and you have to start all over again. It is far better (provided that you are happy carrying out the post-processing) to take multiple shots with different areas lit, and then create one composite image from all of them.

Company:

It is best to have a companion with you during these shoots if possible. Not only are you working in the darkness (and so could stumble and require assistance), but you are working with expensive camera equipment and often some distance away from it. Unfortunately, some in society would gladly take it away from you, so stay safe and take someone with you (preferably someone with much patience!)

As a footnote to this post I should mention that during post-processing of this image I found that I couldn’t open the images in Photoshop directly from Lightroom. If I chose ‘open as layers in Photoshop’ (as I normally do) all that happened was that the Photoshop window opened, but no images. After some Googling it appeared that the way around it was to uninstall and then reinstall both Photoshop and Lightroom. It was a long-winded faff, but it worked. I have no idea why this occurred; it was working fine the day before and there had been no updates or other changes. Strange.

Painting with light: Stop light

They always say that you should test any kit before you go on a shoot, particularly if it is the first time that you have used it. This was (kind of) the case on my first Painting with light photoshoot, when I tried my Yongnuo WRS II wireless remote as a shutter release.

I’ve had this for more years than I care to remember and I guess I must have used it numerous times in the past. But never with the Pentax 645Z camera and never, as far as I can remember, in bulb mode.

So, there I was, in a wooded area, in darkness, trying out my Painting with light setup for the first time. My first (background) shot needed to have an exposure time of 5 minutes so I activated the shutter with the wireless release and waited for the allotted time (which seemed to take forever when standing in the dark). When the time was up I pressed the release button on the remote release. Nothing happened. I tried again and then tried pressing the shutter on the camera. Nothing.

Incompatible with my camera

I looked at the top plate of the camera and it indicated that the shot was still being taken. I decided to turn the camera off. But still nothing happened – the LCD panel remained lit and the exposure time was still counting. With the camera turned off!

I had no other choice than to remove the battery from the camera. Fortunately, when I reinstalled it and turned the camera back on, all was well. I continued with the shoot but had to manually press the shutter on the camera each time – which meant fumbling my way back to the camera in the dark after each exposure. It worked, but it wasn’t ideal.

The next day, in the comfort of my home, I tried it again – but with the same result. I can only assume that the electronics of this particular remote shutter release are not compatible with the electronics of the Pentax 645Z when in bulb mode (it seems to work fine in any other exposure mode). It’s a bit of a shame, especially when I had just spent ยฃ7 on new batteries for it.

Fortunately I remembered that I had an infrared remote shutter release from a previous Pentax camera and tried that. The Pentax 645Z has a forward mounted sensor which means I can use it in front of the camera, and also a red flashing light to show when the shutter is activated, which will make it much easier in the dark to know what is going on. In hindsight, this infrared release may be a much better option.

Infrared shutter release

Painting with light: Shed light on the matter

So what settings do we use for Painting with light? I think (or at least hope) that most people will already guess that we will be using some long shutter speeds and choosing these manually rather than letting the camera try to work it out. But what about the rest of the settings. There are no hard-and-fast rules, so here are the settings I tend to use, not forgetting the basic exposure triangle of sensitivity, aperture and shutter speed.

Top Tip: Turn down the brightness of your LCD preview screen otherwise, in the dark it will make your images seem very bright when, in actual fact, they may be underexposed. Alternatively, use your histogram rather than relying on the image.

Sensitivity (ISO):

Whenever you are taking long exposures in low light there is always a risk of getting too much noise (which manifests itself as a grainy appearance on the image). Therefore you ideally need as low an ISO as possible, and so I always aim to use ISO 100 as standard (which goes back to my days of using film). Of course, there may be instances when you need use a higher ISO, but always bear in mind the noise it will introduce.

Post-processing may have noise reduction settings built in, but they always come with a price of increased softness (although the latest Adobe Denoise addition to Lightroom Classic does an exceedingly good job).

Aperture:

The aperture chosen depends very much on how much of the shot you want to be in focus (as with any other genre of photography) whilst bearing in mind that the smaller the aperture, the longer the exposure time will need to be. As a general rule though, an aperture of f/8 to f/11 will be fine.

Shutter speed:

You will be using a shutter speed of seconds rather than portions of a second. The exposure of each shot will be dictated by the intensity of the light from your torch and the surface being lit rather than the length of time that the shutter is open. A glossy white surface (e.g. a painted wall) will take much less exposure time than a rough, matt and dark surface (e.g. the bark on an old tree). You will be using the ‘Bulb’ setting on your camera which keeps the shutter open whilst you walk around the shot with your torch.

The exposure time of the image will be dictated by how long you shine your torch at the surface being lit. Generally this will be between 5 and 10 seconds. Don’t leave the shutter open in bulb mode for more than a minute though, otherwise ambient light (from the moon, stars, street lights, etc) will start to lighten the overall image.

White balance:

The white balance chosen can have a drastic effect on the ‘mood’ of the image because it controls the overall colour cast. In the early stages you may wish to leave it set on ‘auto’, but as you progress you may decide to choose it manually, with lower settings (around 2500K) producing a cooler/bluer image, whilst higher settings (around 10,000K) producing a warmer, orange image. It is all down to personal preference.

Of course, if you shoot in RAW (see below) you can adjust this easily in post-processing.

Shoot RAW:

With this type of photography you really want to retain as much data as possible from the image file, especially as you will be post-processing the image later on. Whenever possible always shoot RAW (rather than JPEG). This will also give you the option to adjust the white balance (see above) in post-processing to alter the overall colour balance of the shot or, if you follow my advice to shoot numerous images to blend together, to alter the colour balance in specific parts of the image.

Focussing:

You don’t want your camera hunting for a focus point in the dark every time you press your shutter button so either focus manually or use back-button focussing (whilst shining your torch on the focus point).

Horizon:

It is easy to become slightly disoriented in the dark and, without being able to see the image clearly in the viewfinder, set up the camera on a tilt – which is only apparent when you get home and view your images on your monitor. Of course, you can align the image in post-processing but, at the same time, you will end up cropping off the corners.

It is far better to use the electronic horizon (if your camera has that option) and levelling the camera on your tripod before you start.

Shooting cars

In a change from the type of car shots I have been known to take in the past, here are some automotive detail shots.

The subject of these shots is powered by a petrol-fuelled internal combustion engine (ICE), which, we are led to believe, is a dying breed, as we are shepherded to ditch them in favour of battery-powered vehicles. The ICE has been powering motor vehicles for over 130 years, ever since Carl Benz applied for a patent for his โ€œvehicle powered by a gas engineโ€ in 1886 and yet (suddenly, it seems) they are very ‘bad’ and must be replaced.

Battery-powered vehicles were actually developed at precisely the same time as their ICE counterparts, and yet, up to now, they have never been favoured (apart from niche applications such as milk floats) mainly due to their relatively short range and long recharging times. Of course, battery technology has advanced in recent years, particularly with the development of lithium-ion cells (although there are question marks over their environmental credentials and safety record), but the limitations of range and recharging times still apply.

This culture change being applied to motorists is being mirrored (excuse the pun) in the photography world as Single Lens Reflex (SLR) cameras are being ditched in favour of mirrorless versions (which, coincidentally, rely heavily on a battery). The SLR camera has existed for 160 years, but the first commercial mirrorless camera was launched less than 20 years ago, and it has only recently gained huge popularity, probably due to some clever marketing.

In the case of car engines, we are being coerced into changing by the use of legislation – from electric vehicle (EV) targets issued to manufacturers to charges for using the roads (the recent ULEZ charge in London is a case in point). With cameras, the drive to change is from the manufacturers themselves and, it seems, from the photographic media. In both cases, the consumer (i.e., you and I) will make the ultimate decision by voting with our cash. Maybe this won’t be apparent in the short term, but it will be interesting to see how it pans out over the next few years and whether the tried-and-tested technology remains the people’s choice.

Painting with light: Travelling light

Wheelbarrow by night

Fortunately, Painting with light doesn’t require a lot of expensive gear. In fact, you may have most of it already. However, to be successful there are some basic requirements and so here are the essentials for your kit bag:

First on the list is a camera suitable for taking long exposures. You don’t need a high-end, expensive camera; it could be a DSLR, mirrorless, compact or even a camera phone. It may seem pretty obvious, but the important thing is that it needs to be able to attach to a tripod (see below) and to be able to take long exposures, sometimes of several minutes (most cameras have 30 seconds as their maximum automatic exposure time). The best solution is a camera with a ‘bulb’ setting (sometimes abbreviated to ‘B’ setting), allowing the shutter to stay open for as long as you press the shutter release.

The ‘B’ or ‘Bulb’ setting is useful for long exposures

‘Bulb’ setting is so-called because in very early cameras, the shutter was activated by a pneumatic rubber bulb which, when pressed, activated the shutter.

Even better is one with the option to attach a remote shutter release (see below), which helps reduce the risk of camera shake because you don’t need to touch the camera for every shot.

Second, on the list of requirements is a sturdy tripod. As you will see from later blog posts, I am taking numerous exposures and blending them together in layers during post-processing. This means I need every shot to be in exactly the same place each time. I do appreciate that there are auto-blending options in some post-processing software, but these are never exact, and it is far better to get it right in camera. It’s not only the tripod, though; you also need to ensure that the tripod head is equally sturdy. Ball-head types can sag slowly, especially with larger lenses. Personally, I use a geared tripod head.

A geared tripod head can prevent the camera from drooping during a long exposure || ยฉ Average Images

Thirdly, it makes sense to use a remote shutter release so that you are less likely to knock the camera’s position as you activate the shutter. This still means that you have to go backwards and forward to your camera for each shot (in the dark!) so a wireless one is preferable. The only problem with wireless versions is that they are usually only designed to trigger the shutter, not to hold it open; my Pentax 645Z has the option (in ‘B’ mode) to open the shutter with one press and then close it with a second press. Check your camera’s manual to see if this is an option (you may have to activate it in the settings menu).

A wireless infrared shutter release

Fourthly, and perhaps obviously, some lights. Torches are more than adequate, and I use a powerful Ledlenser MH10 head torch for the larger areas (and to see when moving about), together with a smaller Scangrip Matchpen pen torch for detailed lighting. The head torch has a zoom function, which is handy for lighting the tops of trees, and the pen torch (which is actually designed for inspecting the paintwork of cars) has two different light temperature settings, which is something I will try out in a later blog post.

My preferred torches
A red light is kinder to your eyes

The pupils of your eyes will naturally open up wide in the dark, which can be somewhat of a shock if you turn on a torch to study your camera settings; some torches come with a ‘red light’ mode which is a bit kinder to your eyes when working close-up. This Petzl E+Lite head torch is small enough to fit into your kit bag (although a bit uncomfortable for long-term use).

My Pentax 645Z has a handy built-in backlight for the top LED screen, negating the need to use a torch when adjusting camera settings. You just need to familiarise yourself with finding the button position in the dark.

Illuminated Pentax 645Z top plate

Optional:

Although not a necessity, if you want to light up a large area quickly, or maybe light up the interior of a building, then a flashgun comes in very handy, provided that you can operate it manually.

Metz flashgun

And that is it, so at least my camera equipment isn’t heavy. Of course, when it’s dark, it also goes chilly, so you need to wrap up warm and, whilst you are at it, try and wear some dark clothing that isn’t going to reflect any light. Your camera battery won’t last as long either, so you may want to pack a spare one.

I also use a handy clip-on LED light to illuminate my camera bag

Titterstone Clee

Titterstone Clee ruins

Today we took the dogs for a walk on Titterstone Clee, a hill in Shropshire close to the town of Ludlow. I can’t remember exactly when I last visited, even though it is only 30 miles from home, and my only (vague) memories are visiting as a child with my parents.

The summit has a multitude of derelict buildings protruding from its sides. Given it’s splendid viewpoint over the Shropshire plains it would be easy to think that these had a military history, but the reality is that these are from years of quarrying – due to the abundance of Dolerite, a stone which is widely used for road building. The buildings are of industrial archaeological interest because they are early examples of the use of reinforced concrete. At one time over 2,000 people were employed at these quarries – it must have been a bleak place to work in the Winter.

A little higher up the hill, on the summit, are a couple of ‘golf balls’ (as they are known locally). In the Second World War a RAF radar station was established here. It closed in 1957 but was later reactivated as part of the National Air Traffic Services monitoring the UK airspace – the larger ‘golf ball’ monitors aircraft within a 100-mile radius, the smaller one is a Met Office weather radar station

Not unlike a scene from a James Bond movie

It was a fascinating place (and good weather) and so worthy of some photographs. These were taken with my iPhone and once again shows what great images these phones can produce. However, it would be good to make a repeat visit with my medium format camera and take some detailed shots of those derelict buildings.

One of the locals didn’t take too kindly to our presence

And finally, although I am not altogether comfortable with having my photograph taken (preferring to be the other side of the camera), Mrs H did take one that I may use as an avatar:

Painting with light: By the light of the silvery moon

In a departure from my usual type of photography, I have just tried some Painting with light. I have seen plenty of long exposure night photographs over the years (in fact I’ve taken a number myself), but they have generally been the light trails from cars, illuminated architecture, or spinning balls of glowing wire wool. Then I came upon Dirk Ercken, who previously inspired some of my flower photography (see April showers may bring flowers), and who also does Painting with light photography, often on a small scale – sometimes the interior of buildings or small woodland scenes. This is much more appealing to me, so I thought I’d give it a go.

At the time of writing (30th August), the UK was due the brightest and largest moon of 2023. This full moon is referred to as a Blue Moon; but it has nothing to do with its colour, it is just the name given to the second full moon of any given month (there is an excellent explanation of the names of full moons on the Royal Museums Greenwich website). However, it is also a Supermoon because it occurs at a period when the moon is closer to the Earth, making it appear larger in the sky than normal. To have both a Blue Moon and a Supermoon at the same time is quite rare and, on average, only occurs every 10 years.

I therefore decided to make the most of the occasion and capture a Painting with light whilst including the Supermoon. Of course, the moon is nowhere near as large as you imagine when photographed, but at least it adds an interesting background to the shot, even when partially hidden behind the trees.

There is much more to Painting with light than it first seems and it has certainly stimulated my photography. I have therefore decided to write a series of blog posts following my ‘journey’, just in case someone else wants to give it a try during the long Winter months ahead. You will be able to spot which ones they are because they will all have the word ‘light‘ added spuriously somewhere in the title. Keep checking back.

And finally….

Painting with light: I’ve seen the light

Even at my age, I am always surprised when the Summer Solstice (the longest day) arrives at the end of June; Summer seems to have hardly started, and yet the mornings are going to get darker and the evenings shorter. For some time, I have thought about utilising the dark mornings and evenings in my photography, and now is the time to do so, and I’ve decided to do a bit of Painting with light.

So, what is “Painting with light?” I hear you ask. It is simply taking a photograph in the dark and then lighting select parts of the scene with portable lighting during a long exposure, in an attempt to create an ethereal view.

“Is Painting with light the same as Light painting?”. The boundaries are a bit blurred, but light painting generally refers to the act of recording the shapes or patterns of moving lights during a long exposure, with the light source itself becoming the focus of the image, whereas in painting with light the objective is never to see the light source, only its effect. In reality, both terms seem to be interchangeable

OK, so why Painting with light?“. Although it looks relatively easy, there can be more to it than meets the eye. I haven’t done a lot of low-light photography, so it means I will learn something along the way. And not only is there the physical part of taking the images in the first instance, but there is also the post-processing of those images to create one finished landscape. It makes it a bit more interesting to see where I can take it.

So above is my first attempt – and what have I learnt?

  • The image hasn’t really got a focal point, which means you are searching for something to concentrate on. I need to work on my physical composition.
  • The lighting was done quite quickly and from the same height. This makes the image a bit ‘flat’. I need to light from different heights and take my time.
  • I should have lit further back into the shot to create more depth.
  • I need to use a smaller aperture. This was shot at f/8.0 but the foreground is noticeably out-of-focus.

Overall, though, I’m quite pleased with how it has come out and it was fun to do. And isn’t that the point?

In later blog posts, I’ll discuss the gear required for painting with light, the camera settings I use, and my post-processing workflow.

And finally, just to give you an idea about how dark it really was, here’s just one of the 17 images that make up the final shot:

Blooming garden

With June just around the corner the flowers are blooming almost as well as the weeds are growing. Here are a few photographs from another early morning walk around the garden;

Meadow crane’s-bill Geranium

Oriental poppy Papaver
Yellow daylily Hemerocallis liloasphodelus
Siberian iris Iris sibirica
Giant onion Allium gigantium

Flypast

As part of the annual World War II weekend held at the Ironbridge Gorge in Shropshire, we were treated to a flypast by the Battle of Britain Memorial Flight (BBMF); a Lancaster, Spitfire and Hurricane flew in formation up the river Severn over the famous Iron Bridge, which conveniently meant that they flew right over our house. Here are some photographs:


And finally … the memorial flight gets photobombed by a crow: