
As mentioned in earlier Painting with light blog posts, it is easier to take multiple exposures and then blend them together during post-processing, than to try and capture the scene in one shot. However, this assumes a basic knowledge of some post-processing tools, namely; layers, blending modes and layer masks. Knowing how to use them is useful in all genres of photography, not just Painting with light, and so it is worth having a go.
The first part of this blog post is actually taken from a series of post-processing tutorials that I published on a previous incarnation of this web site way back in 2008. It just goes to show that, although the interface of programs such as Photoshop may have changed, the basic principles still remain.
Layers:
Imagine that you have a photographic print lying on the table in front of you (we can call this the background image). Now place a clear sheet of glass on top of the print and write some text onto the sheet of glass.
As you look down you see both the original image on the print – and the text – as if it were one. But the print itself is exactly as it was and has not been altered in any way. You change the text on the glass, move it so that the text is in a different position, or delete the glass altogether; all without affecting the original print.
Now add a second sheet of glass over the first one – but a sheet of glass with a grey tint to it.

Now, as you look down, you see a darker image than before, because the grey glass has darkened the appearance of the original print and the text on the first piece of glass. You can still go back to the first piece of glass and alter the text or move its position. If you don’t like the darker version you can take the second piece of glass and throw it away. If you want the original print darker but the text with the original exposure you can swap the order of the sheets of glass, so that the text layer is on top.
This analogy describes how layers work. They can be altered individually to change the overall appearance of the image, but it is non-destructive, and so the original image remains untouched at all times.
Blending modes:
Blending modes dictate how a layer interacts with the layers beneath it.
For example; Here we have the first ‘background’ image from my earlier shot of the small lathe. The background is correctly exposed, with the lathe itself completely in shadow.
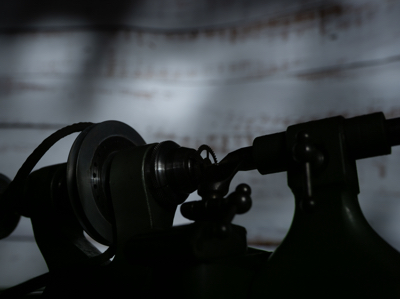
If we add another layer over the top, which has the lathe correctly exposed but the background in darkness, it completely covers the background layer below, almost as if it doesn’t exist.

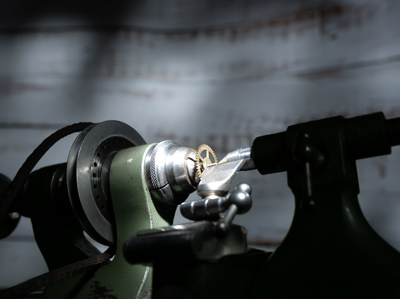
By choosing the ‘lighten‘ blending mode, it allows all of the light areas from the background layer to show through, to blend with the uppermost layer.

Of course, the above example is only blending two layers together, but you can blend an unlimited number – which is how we can build up a Painting with light composite.
There are lots of different blending modes (26 of them in Photoshop), all of which have their own individual uses depending on the type of image that you are processing and the effect that you are after. However, for Painting with light you will nearly always need the ‘lighten’ blending mode.
Layer masks:
So what if you actually don’t want to see part of a layer at all? This is where layer masks come into play. As the name implies, it masks part of a layer.
For example: If we don’t want to see the right-hand side of the lathe as lit by the torch, we open a layer mask and, with a black brush, paint over that section.

This then allows the layer beneath (in this case, the background image) to show through. This is very useful in Painting with light because you can mask out any light overspill on individual layers.
Note that here we haven’t actually painted onto the image, but only onto the mask, allowing the original exposure to show through.
I think that Painting with light is an ideal way to understand how layers, blending modes and layer masks work together, because it is a step-by-step process and very easy to see how one layer interacts with another, and in the next blog post of this series I will go through the entire process from start to finish on one image. Once you get to grips with layers, blending modes and layer masks, you can take them forward into other genres of your photography.
The above is only a very brief description of layers, blending modes and layer masks, because it would be impossible to provide full details in the space available here. If you want to learn more, there are plenty of websites, books and YouTube videos available to guide you on how to use your particular processing program.
Discover more from Ironbridge Images
Subscribe to get the latest posts sent to your email.

